A Guide to Winter Hot Tenting
This article appeared in the February 2022 edition of Outsite Magazine. Find a link to the full magazine below.
Have you thought about getting a bell tent or a winter stove setup for camping? It’s the perfect way to allow us to get out and enjoy nature all year round, and can enable the whole family to join! Not just the hardcore campers. There is a lot to consider when you get into this kind of territory, and like any niche topic, there is a whole world of things to learn and know about, but here are some basic thoughts to get your started. This article is by no means an exhaustive list, but hopefully it might help you get on the right path and see what kind of options would suit your style of bell tent camping.
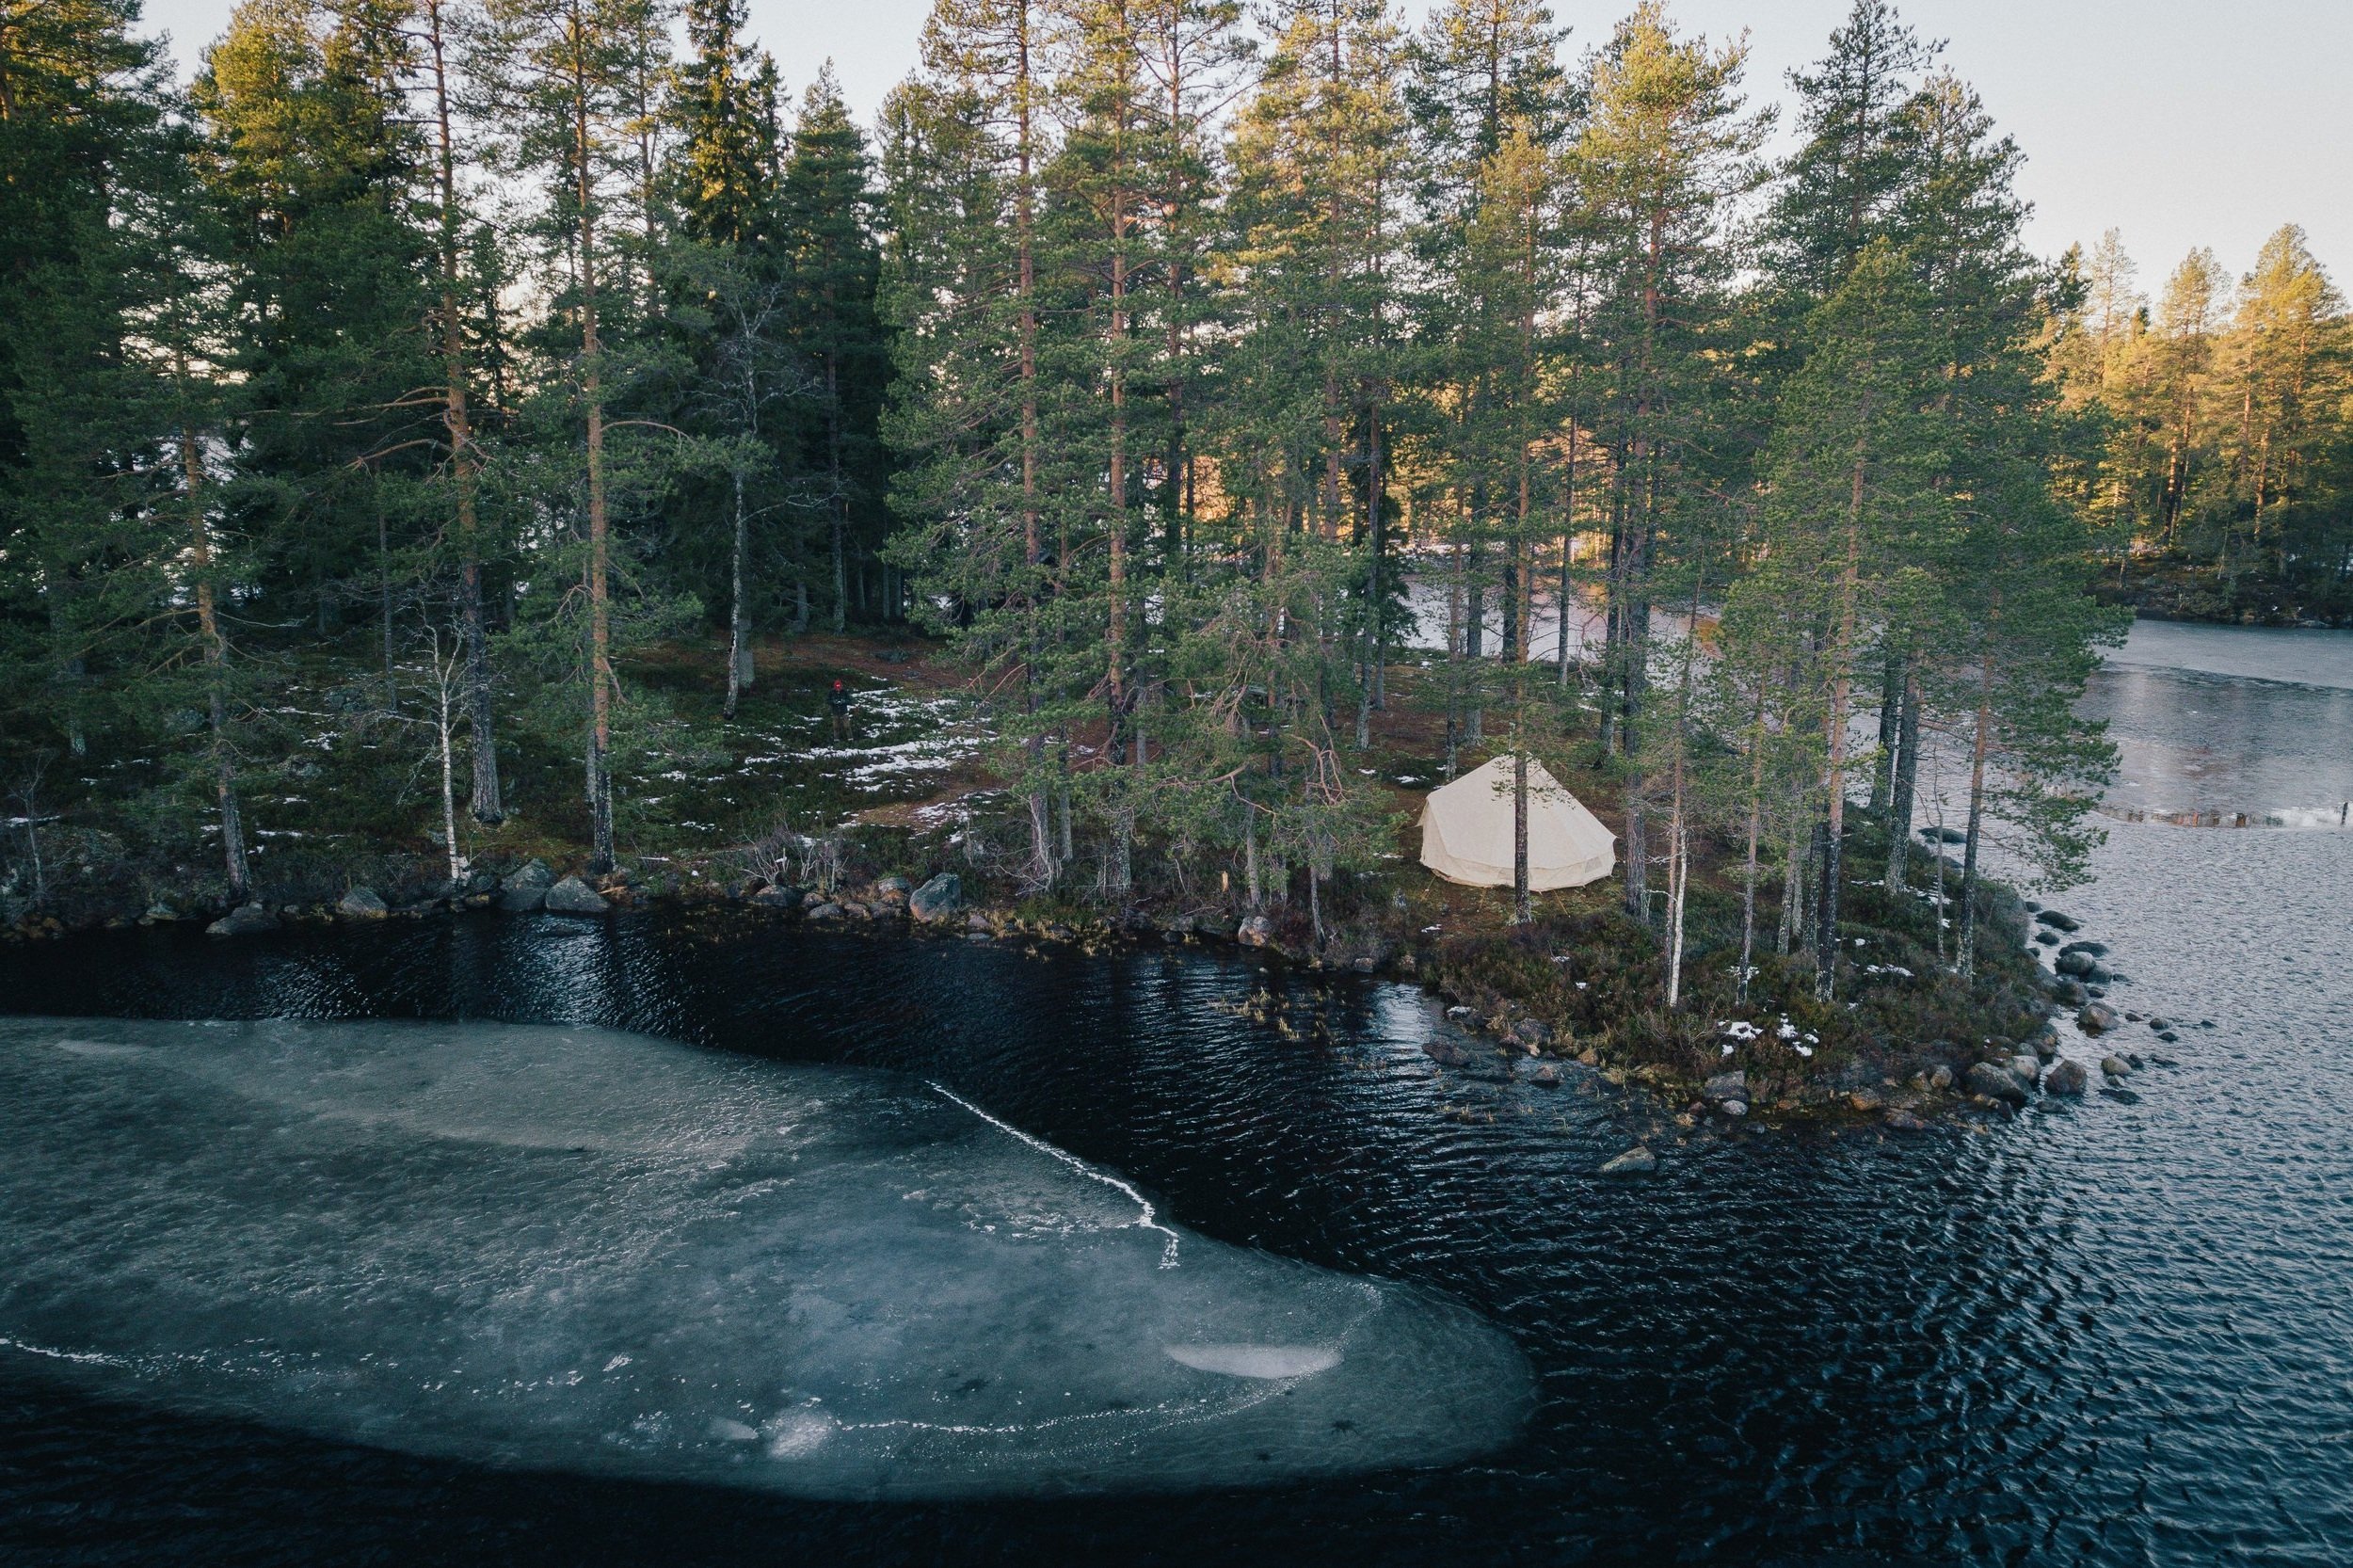
The winter months should never stop us getting outside and enjoying the great outdoors. Unfortunately though, for some people, the idea of sleeping in minus degree temperatures in the snow is scary, and getting damp and cold while trying to sleep can be a miserable experience. I absolutely understand the fear, as I have a tendency to become cold quite quickly myself, and I have to be extra careful with my layering system, making sure I stay warm, but also careful not to become too sweaty or wet with gathering snow on my clothing. When it comes to sleeping also, I have had some really cold nights, having not properly set up my sleep system, or realised too late that some piece of equipment was not up to the task. This wasn’t a huge factor when I lived in Ireland, and very often the easiest solution was simply to bump up the campfire. However it wasn’t until I moved to Sweden a few years ago, and then Finland after that, that I realised, in temperatures sometimes dropping -25 celsius, I was going to have to either spend a lot more money on a new set of extreme temperature sleeping bags, or get myself a heated tent! Both are expensive investments of course, but the idea of the hot tent seemed so exciting to me. Being able to haul my kit across the snow like some kind of Arctic explorer of old, and to have a cosy microclimate to live in, surrounded by a winter wonderland of snow and ice was simply irresistible. And so I went about researching bell tents and lavvus, but very quickly got overwhelmed by the options. So let’s take a look at some of the different combinations available to you, and hopefully I can save you some of the confusion that I’ve had to deal with!
Option 1: The Polish Lavvu
The lavvu, or laavu in Finnish, is a temporary structure that has been used by the nomadic peoples of the Eastern world, Scandinavia and Russia for millenia. The traditional Lavvu has a design similar to a Native American tipi but is less vertical and more stable in high winds and is traditionally made from reindeer hides and other natural materials. Honestly, there is an entire article to write on just this topic alone, but for today let's focus on the modern Lavvu. The most common type of lavvu you will find today, and probably the most affordable, is the military surplus type. I got my one from Military Mart in the UK, but they can also be bought on Ebay. In recent years the Polish Army Lavvu has been the most popular choice, but unfortunately this also means the popularity has made stock a little scarce and prices are going up, especially in the bigger sizes. However, with a bit of digging I have no doubt these can still be bought at relatively affordable prices. The great thing about the Polish lavvu is its versatility.
Definitely not the most lightweight piece of kit out there, but I suppose if you are hot-tenting, then weight is something you simply have to deal with. The original design for this lavvu was that it came in two separate parts, which could also be worn by a soldier as a poncho. Then at camp time, two soldiers could either sleep under their poncho, or in bad weather conditions, could button two ponchos together to make a cotton lavvu that would protect against the wind and rain and keep them comfortable. It’s good to be aware that if you are going to get a Polish lavvu, then there are 3 sizes available. They can be identified by how many eyelets you find at the end of the door flap. Size 1 has a single eyelet, size 2 has two… etc. Depending on when the Lavvu was made, there can be quite a discrepancy in the sizes. But as a safe bet I would recommend going with the biggest size you can get your hands on in order to give yourself more room inside.

“It’s good to be aware that if you are going to get a Polish lavvu, then there are 3 sizes available. They can be identified by how many eyelets you find at the end of the door flap. Size 1 has a single eyelet, size 2 has two… etc”
Modification Options
I myself have used a size 1 and have recently bought a size 3. This larger one I have had modified by Northern Outdoors UK. I highly recommend that, if you are going with this option and have a little extra cash to play with, then get him to modify your lavvu. For my modifications I had him add a skirt around the bottom. This allows me in the summer time to have a lot more headroom, and in the winter, to seal around the bottom with snow, giving me extra warmth. As well as this, I had him stitch in a fireproof fabric to where my stove pipe would exit (more on this later), and added reinforced tensioning straps stitched around the side. There was also a loop stitched to the top of the lavvu in order to have the option to suspend the tent on a ridgeline instead of having a centre pole inside. There are so many other options available, but again, I highly recommend this option if you’re feeling adventurous and want a piece of kit tailored to your own specifications.
Using a stove in the Lavvu
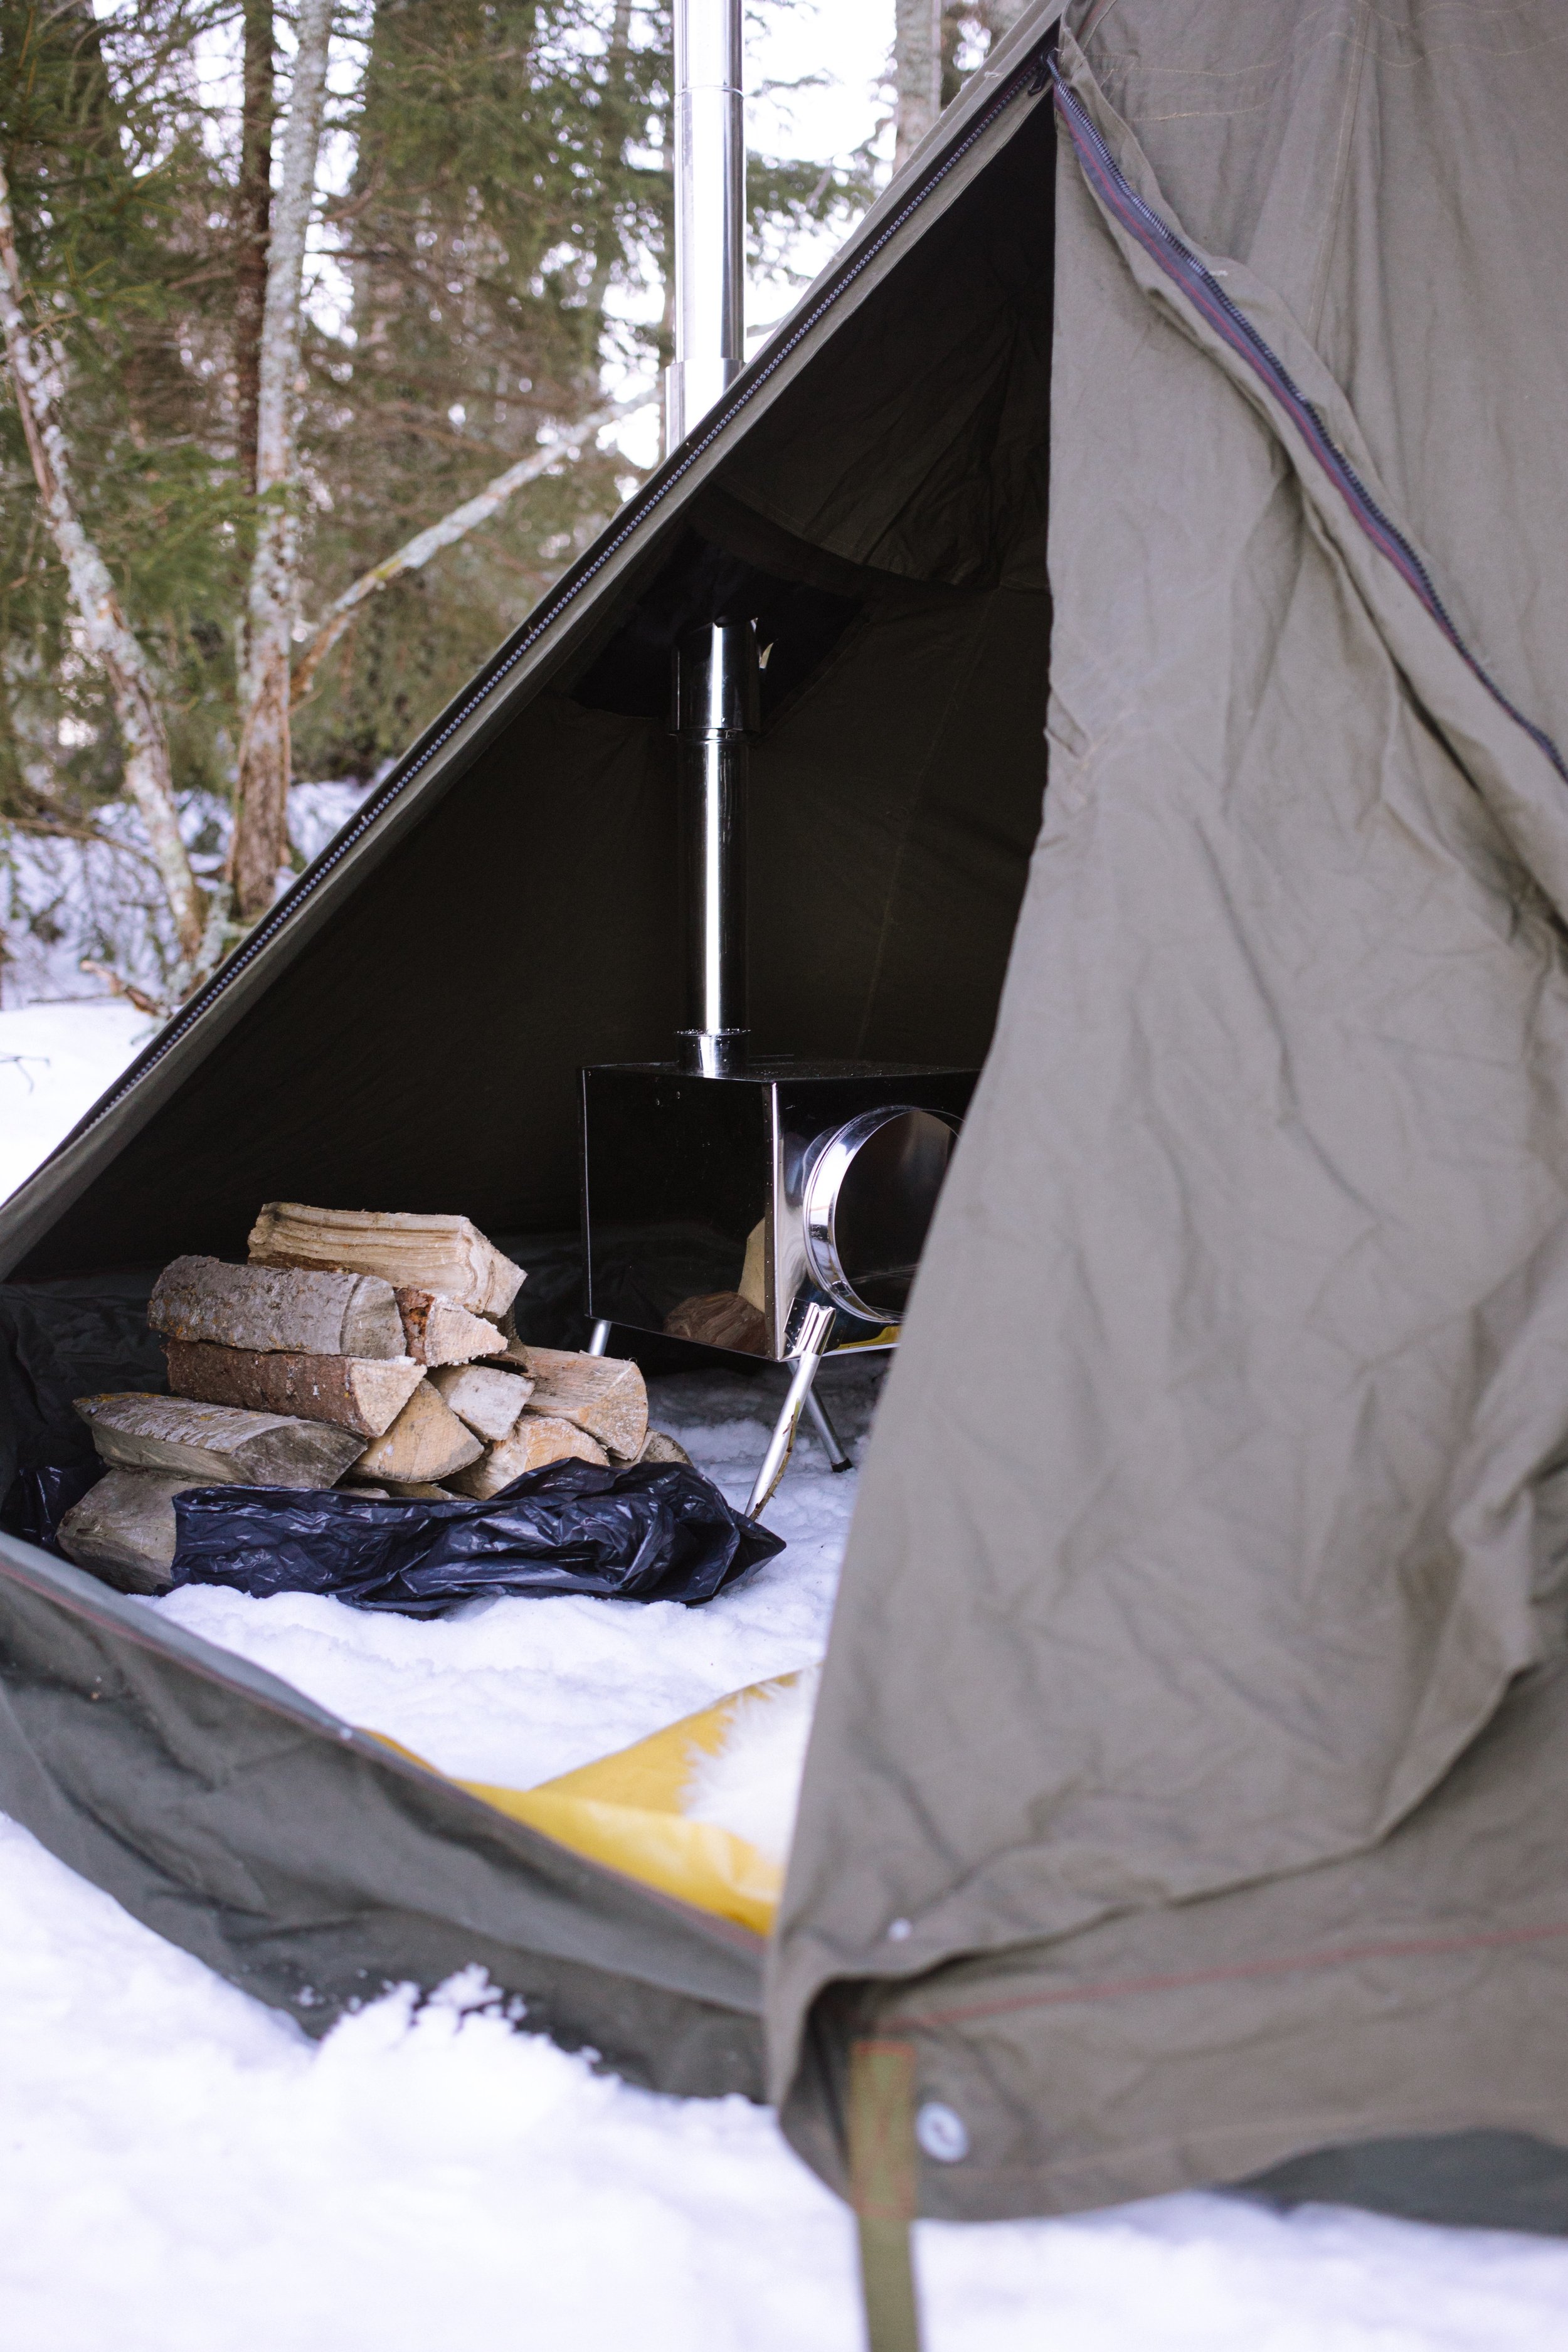
For a lot of people, this is where things can get a little confusing, not to mention expensive. We are going to want to be able to heat our tent in order to protect us from the cold outside. A stove will also have the added benefit of keeping you extra cosy and dry, even if there is very heavy rain outside, with the hot air rising inside and drying out your tent constantly. As with all cotton tents, when the fabric becomes wet from rain or snow, the fibres expand and prevent any rain from getting in, provided you are not constantly touching or rubbing against the walls of your tent. Rest assured, it will keep you dry without the need for any chemical treatments or water repellent sprays. But back to the stove! It is important to maintain safety precautions here, as things can get very hot very fast, and you should always be extremely vigilant with stoves. The way a lot of people use their lavvu is by allowing the pipe of their stove to exit out the “pocket” of the lavvu. This is basically the arm hole for a soldier when he is wearing his half of the lavvu as his poncho. Please be aware though, that this is not the intended design of the poncho and you do this entirely at your own risk.
The best way to do this safely is to either get a double walled section for your stove's pipe or get a fireproof sleeve to wrap around the section of pipe that is exiting through the sleeve. Both are safe options that I have used many times. Stoves and piping and sizings are another topic entirely, so instead of getting into too much detail here I will simply recommend a good starter stove, which is a great size to work in the Polish Lavvu. Tschum is a German company that makes both canvas tents and camping stoves. Their basic stove which can be found here is quite affordable. It does take a little getting used to, and it's difficult to know how your fire is doing all the time. But it is a great stove and not too heavy, and will see you well on your first hot tent adventure! It also comes with a double walled pipe section for safe use in the Lavvu. However I would recommend the added safety of either adding fire proof tape to your Lavvus sleeve, or stitching in a fireproof square for the pipe to exit.
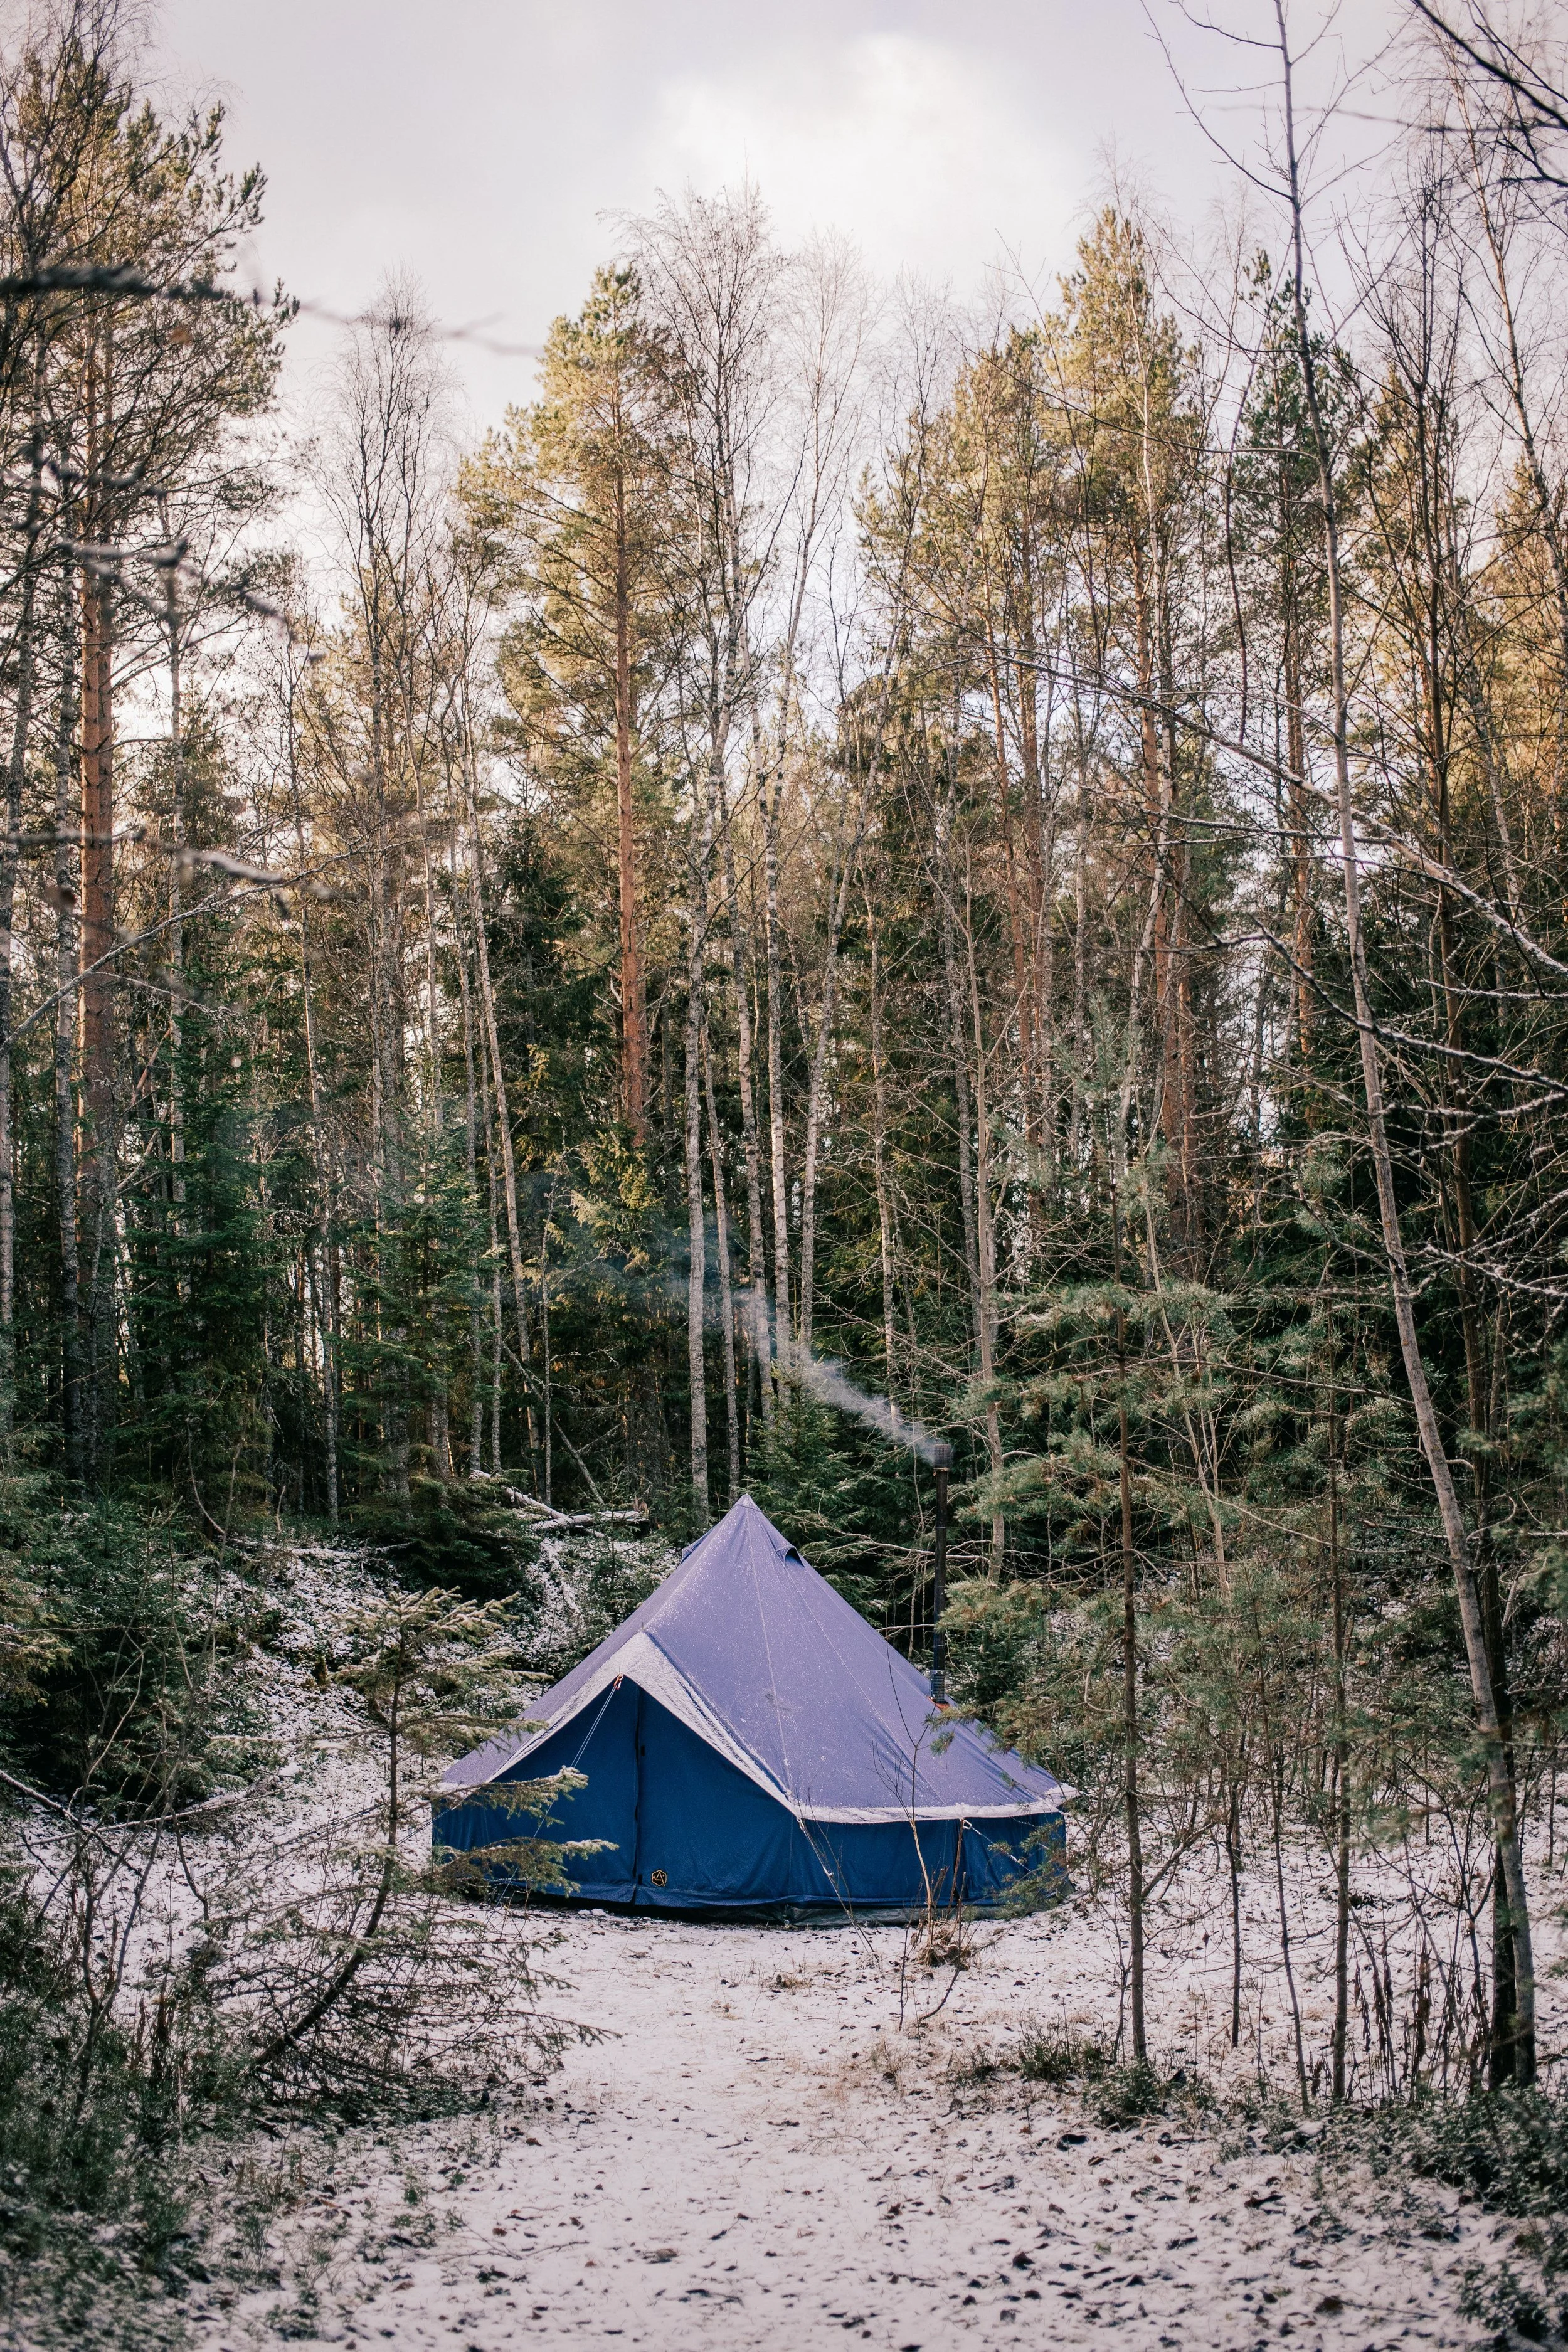
Option 2: The Bell Tent
This is where things get interesting, especially if you are looking to purchase something a little more expensive or bigger in order to accommodate a large group or a family. Again, there are a huge range of options here, and there are many really good companies that make these, such as Tentipi in Sweden, Nordisk in Denmark, Homecamp in Australia and Autentic in Belgium. Whichever you go with, all of the above I have used or slept in, and can attest to their quality. I mentioned above that these options can get expensive, especially if you are looking at some of the larger models that can fit a group of people into them. But perhaps you know another family or a group of friends that would like this too! I would recommend pooling the costs of this equipment with someone, allowing you all to use it and share it with the family when you need it. That way it becomes much more affordable and realistic. You just have to decide which weekends you get it! The added advantage of this option too, is that if you can afford a bigger model, then you can fit everyone in, when a family group may want to go out camping together.
Considerations for Bell Tents
Considering the amount of good companies that make bell tents, it would be difficult to go into all the specs, however, there are a few things to consider when you're buying a bell tent that is suitable for winter camping. Firstly, the bigger the tent, the harder it is to heat, and the bigger your stove will have to be.
This is something you should be aware of and perhaps be realistic with yourself about how big a tent you actually need.
The Polish Lavvu we spoke about earlier can be +25 degrees in a matter of minutes after lighting the stove, and can be easily maintained by adding small sticks to the fire. A 4 metre bell tent however, will need a much larger stove that will have to have bigger logs added. Bigger logs do mean you get a longer burn time however, and the fire doesn't need as much maintenance as with a smaller stove. Just remember… a big tent equals a big stove and a big stack of logs to burn.
Another thing to consider when purchasing a bell tent is that, unless you are going with a company like Tentipi who have a tipi style opening out the top of the tent, you will have to install a flashing kit to safely have your stove pipe exit the tent. This sounds a lot scarier than it actually is in practice, but basically in order to have your stove working correctly, you will need a fireproof, heat resistant rubber opening in the tent, which will involve you having to cut away a hole in the side of your beloved tent. Yes, this is a terrifying idea, but trust me, if you are careful, it is a piece of cake. I have done this twice now with no problems. To do it yourself just follow this video. There are a number of companies that sell flashing kits but Winnerwell seems to be the most popular.


Option 3: DIY
Of course, by its very nature, a lavvu, hot tent or tipi is traditionally a homemade structure. Hundreds of years before any of our fancy modern outdoor equipment or brands were around, people actually lived in these structures. They relied on them to protect against the elements, whilst being flexible and transportable enough to work with their nomadic lifestyles. And there is no reason why we cannot also make these structures for ourselves. If you have the time and the patience for this stuff, then it’s possible to build yourself a really inexpensive hot tent using simple industrial tarps, cotton canvas… even plastic sheets. Personally I have never done this, but there are plenty of options out there. If you want to build yourself a hot tent then I highly recommend you check out Far North Bushcraft on Youtube, as he has a number of fantastic videos on this. Here is one of his most popular videos on the subject and will have you well on your way to building this type of tent for yourself!
Final Tips on the subject of hot tenting
Hopefully I haven't overloaded you with too much info here, and there is enough for you to start thinking about how to get yourself a hot tent setup. The main thing I have learned is to not overthink it conceptually. As we spoke about, people have been living in structures like this for millenia, and usually with little to no money involved. Just some crafty thinking and a bit of ingenuity. Saying that, we also see that, if you have the money, there are plenty of really solid options. But there are just a few small tips and considerations that I wanted to share with you before I leave you on your adventures.
Sleep as high from the ground as you can: As we all know, hot air rises. The bottom of your tent is going to be a lot colder than higher up. So if you have the resources, sleep high. Invest in some camp cots if you can afford it. These will have you sleeping very cosy.
Insulate the floor: So much heat loss occurs through conduction and it’s probably the main source of people having uncomfortable nights sleep in nature.
There is only a piece of tarp between you and the cold hard ground when sleeping, or even standing for that matter! Even if your stove is blazing hot, your feet without boots on in the tent will quickly get cold, bringing your whole body temperature down. When camping on frozen or snowy ground, make sure you line the floor of your tent with space blankets, foil-lined tarpaulin, deer skins, wool blankets, foam tiles, whatever you have… the more the better. And don't leave your air mattress behind. Just because the tent is warm, does not mean the ground is. Insulate yourself from the ground as much as possible.
Go to bed warm: There are a few things you can do to make sure you are warm getting into bed. Your sleeping bag's job is not to heat you, but to trap warmth. So if you’re cold getting into it, it’s going to take a lot longer to get cozy. 3 things you can do to combat this are the following. Eat a high energy snack before bed, like nuts and seeds. This will keep your internal furnace burning for a few hours. Secondly, warm your body physically before bed. A few jumping jacks or a brisk walk around camp should do the trick. And lastly, you can fill your Nalgene bottle with hot water and put it in your sleeping bag 15-20 mins before bed time. Make sure you don’t use a steel bottle though, as these often have rubber seals that are prone to failing with hot water. Nalgene BPA free plastic bottles are designed to deal with boiling water.
Safety: Take every precaution you need to camp safely with a camping stove. Always follow the guidelines of the tent company and the stove's instructions. On top of this, three items that are absolutely essential are as follows. A fireproof blanket, which goes under your stove inside the tent. This will stop any loose embers and hot coals falling out of your stove when you open it from melting a hole in the floor of your beautiful new tent. You will also want a carbon monoxide detector in case of build up in your tent. And lastly, a small fire extinguisher just in case. Things can go south very quickly when it comes to hot tenting. So why not play it safe. All of these items can be purchased affordably from the likes of Biltema or Clas Olson.

The Northern Soul with Wilder Magazine
What does it mean to run a homestead in today's modern world? Last winter I spent a great deal of time with Northern Soul Journeys based in Arctic Sweden. Read the full article at Wilder Magazine